Back to Main


Back to Research


FABRICATION PROCESSES


E-Beam Processes | Wet Processes

File Conversion to JEOL format | Proximity Correction


Links to Other Processes found in MC2 Webpages

Mask Fabrication | PROXECCO Manual 1 | PROXECCO Manual 2


HOW TO RUN PROXECCO FROM WINDOWS


n.b. This is not a PROXECCO manual. It’s just a dummy’s guide to using the PROXECCO program.

Best viewed in INTERNET EXPLORER due to greek symbols.


Requirements:

  1. X-windows

  2. Secure Shell Client

  3. a working account in fy.chalmers.se


Procedure:

  1. Move the GDS files to your physics.fy.chalmers.se account.

  2. Open x-windows.

  3. Open SSH Client, and connect to shockley.mc2.chalmers.se.

  4. Run the program by typing “proxecco” in x-windows.

  5. Load the GDS file that you need to correct.

  6. Generate the PEC file using the Gaussian function.

    1. To do this, you need the proximity parameters, a, b, h.[1] These parameters can roughly be approximated for PMMA resists on SiO2 substrate using the following equations:

    2.  


    where a (mm) is the spot beam diameter of an electron beam, a0 (mm) is the initial beam spot diameter, h (mm) is the resist thickness, E (normalized to 1 keV) is the electron energy and A is a phenomenological constant given by the equation:

.

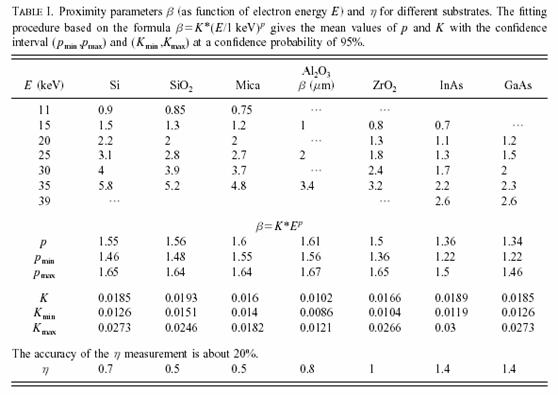
Thus, for 50 keV, which is what is typically used in our e-beam machine, the phenomenological constant, A = 7.605.

    1. .


         The constants K and p,and the parameter h, can be found in the table below.

d.                                                   

  1. To generate the PEC file, in the PROXECCO menu, click

TOOLS → PROXECCO → Generate Prox. Parameter File

  1. The output file should have a PEC extension. It can be saved in any folder so long as you remember where.

  2. Type down the proximity parameters in the Gaussian parameters field for your particular exposure, and the the corrections options, such as number of doses, QUALITY, GRID, BEAM WIDTH, etc. Then, click OK. You can review the parameters in your PEC file from

TOOLS → PROXECCO → Edit Prox. Parameter File

  1.  To run proximity correction, click

TOOLS → PROXECCO → Proximity Correction

  1. Select the CELLNAME and the LAYER(S) to be corrected. Type in the destination layer.

  2. Type in the File Correction Options the PEC file you generated. Click OK to run proximity correction. The output will be the same cell name with new layers corresponding to different doses.

  3. You can retrieve the information on the assigned doses in

TOOLS → PROXECCO → PROXECCO Dosis Information

           You can view at the different layers corresponding to different doses in

                      VIEW → VIEW

           And then select the layers you wish to view.

  1. To generate a new GDS file with proximity corrected parametes, click

FILE → SAVE

And then select the cellname and the new layers, GDSII format, and the directory you want to save the new GDS file in. Click SAVE.

  1. Transfer the GDS file to your vicad1 in the CAD_DATA directory using FTP or SFTP.


[1] Aparshina et. al., Energy dependence of proximity parameters, J. Vac. Sci. Technol. B 15(6) 2298-2302 (1997).


Updated: August 24, 2004, Ian Jasper Agulo


Last edited:  | Disclaimer